![[Updated] In 2024, Seamless iMovie Files to Vimeo Integration Tips](https://thmb.techidaily.com/3f943451ad9f20674a4982a12bf6e3782b7a46fb4a594b07cf7ffe549e83acd7.jpg)
[Updated] In 2024, Seamless iMovie Files to Vimeo Integration Tips
Seamless iMovie Files to Vimeo Integration Tips
How to Upload iMovie Video to Vimeo

Ollie Mattison
Mar 27, 2024• Proven solutions
Many users would like to share their videos from iMovie to their social networks, such as YouTube, Facebook, and Vimeo. iMovie’s “Share” option makes it easy to upload your new video straight to your social networks account from iMovie. In this article, we’ll teach you how to upload iMovie videos to Vimeo easily and smoothly.
Part 1: How to Upload iMovie Videos to Vimeo
In order to upload iMovie videos to Vimeo, you have to set up an account with Vimeo before uploading videos. Watch the video below to upload iMovie video to Vimeo.
Here’re the detailed steps:
Step 1: Click the Share button which can be located at the top of your screen.

Step 2: Select Vimeo.
Then all you need to do is to enter the email address you used to log into Vimeo, your password as well as a title, description, and tags for the video. You can also select which size you’d like your video to be. Then read the Vimeo terms of service and click Publish.
Step 3: Wait for the pop-up message to appear indicating your upload is complete.
Part 2: How to Compress the Video
When trying to upload iMovie videos to Vimeo, many people may get a pop up telling them the file is too big. Don’t dismay as compressing the video will allow you to upload without additional problems.
Step 1: Find the export settings in your program, generally under “File – Export”, “File – Share”, or “Save As”.
Step 2: Select “File” and save the video to Mac.
Step 3: Compress the video.
An alternative to the aforementioned compression method is to use Compressor. Before you can do anything, you need to set up an account first or use an existing Facebook or Google account to do so.
One of the most popular tools that can significantly shrink the file size without losing quality is ClipChamp .
Follow this instruction to compress your videos without sacrificing the quality.
Step 1: Upload your video and set it to compress.
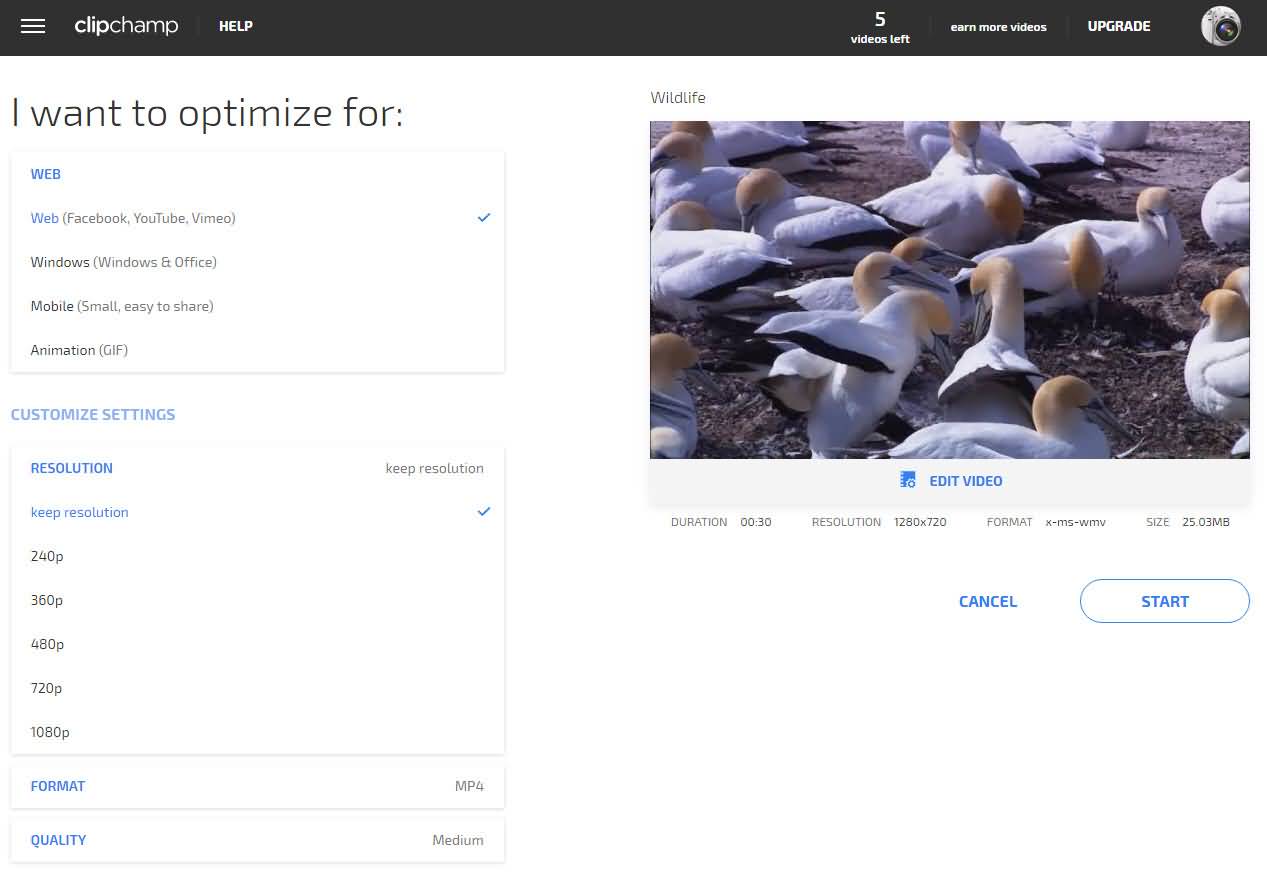
Step 2: Press Start to begin compressing.
Step 3: Then share the video directly to Vimeo.

As you can see, using the Clipchamp compressor to compress before you upload iMovie videos to Vimeo is a simpler, faster way to do. It’s great for people who are new to video making, editing, and uploading. For those with more skill, reducing the steps is an excellent way to save time and get videos up faster.
Ollie Mattison
Ollie Mattison is a writer and a lover of all things video.
Follow @Ollie Mattison
Ollie Mattison
Mar 27, 2024• Proven solutions
Many users would like to share their videos from iMovie to their social networks, such as YouTube, Facebook, and Vimeo. iMovie’s “Share” option makes it easy to upload your new video straight to your social networks account from iMovie. In this article, we’ll teach you how to upload iMovie videos to Vimeo easily and smoothly.
Part 1: How to Upload iMovie Videos to Vimeo
In order to upload iMovie videos to Vimeo, you have to set up an account with Vimeo before uploading videos. Watch the video below to upload iMovie video to Vimeo.
Here’re the detailed steps:
Step 1: Click the Share button which can be located at the top of your screen.
Step 2: Select Vimeo.
Then all you need to do is to enter the email address you used to log into Vimeo, your password as well as a title, description, and tags for the video. You can also select which size you’d like your video to be. Then read the Vimeo terms of service and click Publish.
Step 3: Wait for the pop-up message to appear indicating your upload is complete.
Part 2: How to Compress the Video
When trying to upload iMovie videos to Vimeo, many people may get a pop up telling them the file is too big. Don’t dismay as compressing the video will allow you to upload without additional problems.
Step 1: Find the export settings in your program, generally under “File – Export”, “File – Share”, or “Save As”.
Step 2: Select “File” and save the video to Mac.
Step 3: Compress the video.
An alternative to the aforementioned compression method is to use Compressor. Before you can do anything, you need to set up an account first or use an existing Facebook or Google account to do so.
One of the most popular tools that can significantly shrink the file size without losing quality is ClipChamp .
Follow this instruction to compress your videos without sacrificing the quality.
Step 1: Upload your video and set it to compress.
Step 2: Press Start to begin compressing.
Step 3: Then share the video directly to Vimeo.
As you can see, using the Clipchamp compressor to compress before you upload iMovie videos to Vimeo is a simpler, faster way to do. It’s great for people who are new to video making, editing, and uploading. For those with more skill, reducing the steps is an excellent way to save time and get videos up faster.
Ollie Mattison
Ollie Mattison is a writer and a lover of all things video.
Follow @Ollie Mattison
Also read:
- [New] 2024 Approved Boosting Engagement, Profits with Animated Ad Success Tactics on FB
- [New] A New Lens on Cinema Embracing VR Tech
- [New] Crafting Success on YouTube Standard Studio or Beta for 2024
- [New] Ultimate iPhone Video Editor Comparison Cameo or FilmoraGo for 2024
- [Updated] 2024 Approved Audiovisual Alchemy Transform Your Footage with These 5 Vimeo Editing Methods
- [Updated] 2024 Approved Transform Videos on Vimeo Using Zero-Dollar Resources
- [Updated] 2024 Approved Turning Vimeo Video Into Reusable MP3 Chunks
- [Updated] 2024 Approved Vimeo’s Complimentary Guide Essential Video Editing Skills
- [Updated] Evaluating the Value of SNS HDR in a Crowded Market
- [Updated] Ideal Video Editor Unleashed for Vimeo Videos for 2024
- [Updated] Retro Gaming Revived - Top 5 Emulators to Play Your Favorite PS1 Titles for 2024
- 2024 Approved Unveiling the Magic of End Screens for Vimeo Content
- Discover Hands-Free and Face-to-Face Interaction for Free: Master Tango Calls Now!
- Ergonomic & Convenient MoKo Bluetooth Keyboard – Ideal for All Devices!
- Essential FreeFire Hashtags to Skyrocket Video Views on YouTube for 2024
- In 2024, Edit MOV Files for Free Top 10 Video Editors
- In 2024, The Most Effective Ways to Bypass Apple iPhone 13 mini Activation Lock
- In 2024, Tomorrow’s Evaluation Creative Pathways
- Overcoming Missing Execution Records on PC
- Title: [Updated] In 2024, Seamless iMovie Files to Vimeo Integration Tips
- Author: Michael
- Created at : 2025-03-03 16:03:51
- Updated at : 2025-03-04 16:58:42
- Link: https://vimeo-videos.techidaily.com/updated-in-2024-seamless-imovie-files-to-vimeo-integration-tips/
- License: This work is licensed under CC BY-NC-SA 4.0.