![[Updated] In 2024, Mastering Vimeo Recorder Capturing Screens & Cameras on Streams](https://thmb.techidaily.com/c225407e5eb523ea35626965d7952f3e8eff461a435028604a3c634507f598f5.png)
"[Updated] In 2024, Mastering Vimeo Recorder Capturing Screens & Cameras on Streams"
Mastering Vimeo Recorder: Capturing Screens & Cameras on Streams
How to Use Vimeo Record Tool

Shanoon Cox
Mar 27, 2024• Proven solutions
Access to communication with customers and team members becomes far better, faster, and more interactive with Vimeo screen recording. Constant emailing, slow response times and frequent misunderstandings are the things of the past. The Vimeo recorder provides face-to-face communication and much-needed support even though you may be located miles away.
One of its greatest features is that you can capture both the camera feed and your screen at the same time , and show everyone exactly what you intended. Team members or customers will appreciate this type of interactive collaboration, and might respond with increased productivity, satisfaction, and loyalty. With Vimeo recorder, you can successfully create educational tutorials, sales presentations, or show a demo version of your product.
This extraordinary platform allows you to upload any type of video files and use advanced tools to organize, manage and publish your content.
Part 1: How to Use Vimeo Record Tool to Record Your Screen on Windows and Mac?
Almost every Windows and Mac device has a built-in screen recorder, and those are typically quite solid and fairly easy to use. Still, at times may be necessary to go beyond the built-in tool frameworks, and infuse your work with exceptional professionalism.
You can achieve that with the Vimeo Record tool. You don’t need to be concerned about compatibility when you work with Vimeo recorder, as it supports Windows, Mac, Android, iPad, iPhone, or iPod Touch. Since virtually all devices can run the Google Chrome browser, pretty much anyone can use the Video Record Chrome extension to record the screen.
The process is not complicated, and even non-tech users can simply run the extension. We introduce you in detail to the screen recording procedure with this great Vimeo recorder.
- Install Vimeo Record Extension
Currently, the Vimeo Record chrome extension works on the Google Chrome browser only. If you don’t already have a Google Chrome browser on your device, install and launch it. After that, download the Vimeo Record Chrome extension , and create a new Vimeo account.
You will access this tool faster, with just one click, if add and pin the extension to your top bar. It is important to allow Vimeo extension to have access to your camera and microphone.
- Start Recording with Vimeo Recorder
Click the Vimeo Record icon in the extension toolbar, and then decide to record the full screen or current tab screen, or record the camera to include footage of yourself in the video or both. If you decide to keep the webcam on, you can drag and drop camera preview to the part on the screen you want to record, and use that camera feed like a mirror to get feedback of your face.
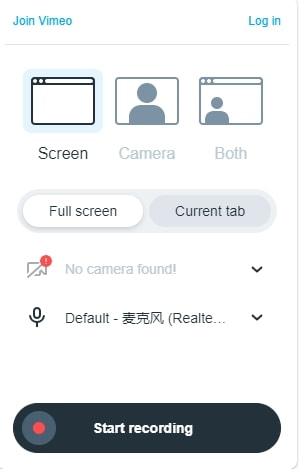
Click the Start recording button to record. After you start the recording session, you can show your creativity and capture the actions you are taking.
The recording will be saved even if something unforeseen happens, for example, if your internet connection snaps.
On the other hand, the process will be interrupted if the extension loses access to the camera, screen, or microphone. It is important to know that recordings are limited to a maximum of two hours per video.
- Stop recording with Vimeo Recorder and share
When you decide to stop recording, find the Stop sharing button at the bottom of your screen. Click on it, and save the video.

If you are satisfied with the video you recorded and want to share it, you can select one of many distribution options from the Vimeo recorder interface, or just copy the link at the bottom of the screen to share. You can also click the download icon to save it to the local.
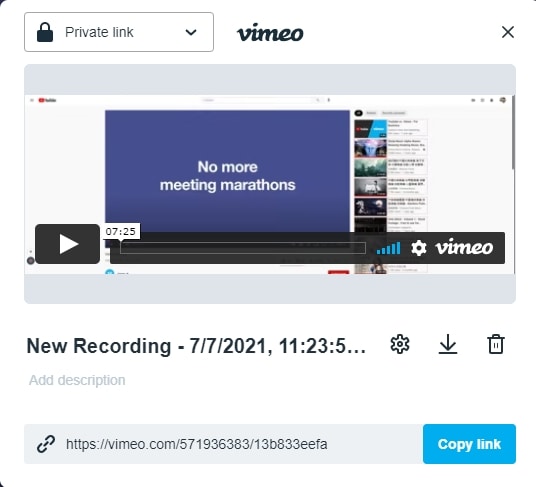
The video will be uploaded to your Vimeo account and stored in the Recordings folder as well. If you are an Enterprise team member, the video will be uploaded to your Private folder on the Enterprise team account. Click the View Settings on Vimeo and you can add a title and description of the video in Vimeo directly.
You can choose whether to download the video privately, or publish it on social media. The Vimeo extension allows sharing the video only with people you choose.

Part 2: How to Record Vimeo Video Screens on Mobile?
As we said before, the Vimeo Record tool is currently available as a Chrome extension, and there is no app of Vimeo Record for iPhone or Android devices. But if you want to record the Vimeo video screen on mobile, you can do that.
Android devices, including Android 10, offer built-in screen recording . Here is how to capture the content of your Android mobile screen:
In the Quick Settings menu, launch Screen Recording. Of course, depending on the purpose of your video, you can allow access to mic only, camera only, or both. At the beginning of the process, you will see a short countdown - 3, 2, 1, and the recording starts. Piece of cake!
After you are done performing all the actions on your phone that you want to share on Vimeo, just stop recording and your video will be saved automatically in the cloud. You can download videos to your phone or share them instantly through one or more social media platforms. It’s not hard to stay in touch with all the recordings and get notifications whenever someone views the video and comments. Using this approach for business will put you in a better position in the market and stimulate engagement with the customers.
If you are using the iOS devices, you can record the Vimeo video screen with the in-built screen recorder feature if your iPhone is running iOS 11 and later versions. We have written an article about how to record iPhone/iPad’s screen in detail, you can find all the information needed.
Part 3: How to Record Vimeo Video Screen with Wondershare Filmora X?
Wondershare Filmora is a great solution for screen recording and video editing. This software suite is packed with professional-level options and stunning visual effects, allowing you to do far more than simply capture the screen. Among other things, you can precisely define which section of the screen to record, eliminate camera shake effect or noise, add music to the background, and improve the quality of your videos in many creative ways.
In other words, using Filmora to record your screen and webcam gives you additional options to express yourself and fulfill your business objectives while saving time for you and your team. Of course, Filmora X can share the content directly to Vimeo or save it for further editing.
Starting a screen recording in Filmora X is a straightforward process as you just have to navigate to the Record drop-down menu, and then select the Record PC Screen option. A new window will pop up on your screen where you can adjust the settings for your next screen capturing session.

The software lets you specify the area of the screen you want to capture or record the entire screen, as well as choose the preferred video resolution. In addition, you have to make sure that external microphone is selected in the audio menu if you want to narrate your video.

Furthermore, ticking the Record the Camera Stream checkbox at the bottom of the window will enable you to capture the screen and webcam feed simultaneously. When ready, you should click on the Red Record button to initiate the screen recording session.
Filmora X lets you pause the recording whenever you want, while you can also use the Record Timer box to limit the duration of the session. After you’ve recorded the footage, you can use the video editor’s tools to polish the footage before exporting it or uploading it to your Vimeo account.


Quick Fix: Why I Can’t Use Vimeo Recorder on My Mac Computer?
After installing the Vimeo screen recorder, Mac users sometimes need to perform a few preparatory steps to allow the extension to launch. Open System Preferences, and click the Security & Privacy icon. Scroll to Screen Recording, and allow Google Chrome access to the content of the screen.
Of course, at this point, you’ll also have to grant permission to access your camera and microphone. Once you activate all the necessary options, restart Chrome and full range of screen capturing tools will be at your disposal.
Conclusion
Possibilities for personal and professional communication are almost unlimited once you master the advanced features of the Vimeo screen recorder of your choice. Regardless of your choice of software tools, it’s very easy to produce high-end educational materials and how-to-do videos, or simply share your current thoughts with online friends.
However, if you have an ambitious project, built-in screen recording tools may not be sufficiently advanced. Using the Wondershare Filmora X to record and edit Vimeo clips based on the feed from your screen and webcam is a better option, especially for users who understand how to effectively use the finer video-making features of this incredible software. You can even record your mobile screen and create videos nearly instantly, so your creativity is virtually unbound when you have the right tools in your hands.
Shanoon Cox
Shanoon Cox is a writer and a lover of all things video.
Follow @Shanoon Cox
Shanoon Cox
Mar 27, 2024• Proven solutions
Access to communication with customers and team members becomes far better, faster, and more interactive with Vimeo screen recording. Constant emailing, slow response times and frequent misunderstandings are the things of the past. The Vimeo recorder provides face-to-face communication and much-needed support even though you may be located miles away.
One of its greatest features is that you can capture both the camera feed and your screen at the same time , and show everyone exactly what you intended. Team members or customers will appreciate this type of interactive collaboration, and might respond with increased productivity, satisfaction, and loyalty. With Vimeo recorder, you can successfully create educational tutorials, sales presentations, or show a demo version of your product.
This extraordinary platform allows you to upload any type of video files and use advanced tools to organize, manage and publish your content.
Part 1: How to Use Vimeo Record Tool to Record Your Screen on Windows and Mac?
Almost every Windows and Mac device has a built-in screen recorder, and those are typically quite solid and fairly easy to use. Still, at times may be necessary to go beyond the built-in tool frameworks, and infuse your work with exceptional professionalism.
You can achieve that with the Vimeo Record tool. You don’t need to be concerned about compatibility when you work with Vimeo recorder, as it supports Windows, Mac, Android, iPad, iPhone, or iPod Touch. Since virtually all devices can run the Google Chrome browser, pretty much anyone can use the Video Record Chrome extension to record the screen.
The process is not complicated, and even non-tech users can simply run the extension. We introduce you in detail to the screen recording procedure with this great Vimeo recorder.
- Install Vimeo Record Extension
Currently, the Vimeo Record chrome extension works on the Google Chrome browser only. If you don’t already have a Google Chrome browser on your device, install and launch it. After that, download the Vimeo Record Chrome extension , and create a new Vimeo account.
You will access this tool faster, with just one click, if add and pin the extension to your top bar. It is important to allow Vimeo extension to have access to your camera and microphone.
- Start Recording with Vimeo Recorder
Click the Vimeo Record icon in the extension toolbar, and then decide to record the full screen or current tab screen, or record the camera to include footage of yourself in the video or both. If you decide to keep the webcam on, you can drag and drop camera preview to the part on the screen you want to record, and use that camera feed like a mirror to get feedback of your face.
Click the Start recording button to record. After you start the recording session, you can show your creativity and capture the actions you are taking.
The recording will be saved even if something unforeseen happens, for example, if your internet connection snaps.
On the other hand, the process will be interrupted if the extension loses access to the camera, screen, or microphone. It is important to know that recordings are limited to a maximum of two hours per video.
- Stop recording with Vimeo Recorder and share
When you decide to stop recording, find the Stop sharing button at the bottom of your screen. Click on it, and save the video.
If you are satisfied with the video you recorded and want to share it, you can select one of many distribution options from the Vimeo recorder interface, or just copy the link at the bottom of the screen to share. You can also click the download icon to save it to the local.
The video will be uploaded to your Vimeo account and stored in the Recordings folder as well. If you are an Enterprise team member, the video will be uploaded to your Private folder on the Enterprise team account. Click the View Settings on Vimeo and you can add a title and description of the video in Vimeo directly.
You can choose whether to download the video privately, or publish it on social media. The Vimeo extension allows sharing the video only with people you choose.
Part 2: How to Record Vimeo Video Screens on Mobile?
As we said before, the Vimeo Record tool is currently available as a Chrome extension, and there is no app of Vimeo Record for iPhone or Android devices. But if you want to record the Vimeo video screen on mobile, you can do that.
Android devices, including Android 10, offer built-in screen recording . Here is how to capture the content of your Android mobile screen:
In the Quick Settings menu, launch Screen Recording. Of course, depending on the purpose of your video, you can allow access to mic only, camera only, or both. At the beginning of the process, you will see a short countdown - 3, 2, 1, and the recording starts. Piece of cake!
After you are done performing all the actions on your phone that you want to share on Vimeo, just stop recording and your video will be saved automatically in the cloud. You can download videos to your phone or share them instantly through one or more social media platforms. It’s not hard to stay in touch with all the recordings and get notifications whenever someone views the video and comments. Using this approach for business will put you in a better position in the market and stimulate engagement with the customers.
If you are using the iOS devices, you can record the Vimeo video screen with the in-built screen recorder feature if your iPhone is running iOS 11 and later versions. We have written an article about how to record iPhone/iPad’s screen in detail, you can find all the information needed.
Part 3: How to Record Vimeo Video Screen with Wondershare Filmora X?
Wondershare Filmora is a great solution for screen recording and video editing. This software suite is packed with professional-level options and stunning visual effects, allowing you to do far more than simply capture the screen. Among other things, you can precisely define which section of the screen to record, eliminate camera shake effect or noise, add music to the background, and improve the quality of your videos in many creative ways.
In other words, using Filmora to record your screen and webcam gives you additional options to express yourself and fulfill your business objectives while saving time for you and your team. Of course, Filmora X can share the content directly to Vimeo or save it for further editing.
Starting a screen recording in Filmora X is a straightforward process as you just have to navigate to the Record drop-down menu, and then select the Record PC Screen option. A new window will pop up on your screen where you can adjust the settings for your next screen capturing session.
The software lets you specify the area of the screen you want to capture or record the entire screen, as well as choose the preferred video resolution. In addition, you have to make sure that external microphone is selected in the audio menu if you want to narrate your video.
Parental Control Software
Furthermore, ticking the Record the Camera Stream checkbox at the bottom of the window will enable you to capture the screen and webcam feed simultaneously. When ready, you should click on the Red Record button to initiate the screen recording session.
Filmora X lets you pause the recording whenever you want, while you can also use the Record Timer box to limit the duration of the session. After you’ve recorded the footage, you can use the video editor’s tools to polish the footage before exporting it or uploading it to your Vimeo account.
Quick Fix: Why I Can’t Use Vimeo Recorder on My Mac Computer?
After installing the Vimeo screen recorder, Mac users sometimes need to perform a few preparatory steps to allow the extension to launch. Open System Preferences, and click the Security & Privacy icon. Scroll to Screen Recording, and allow Google Chrome access to the content of the screen.
Of course, at this point, you’ll also have to grant permission to access your camera and microphone. Once you activate all the necessary options, restart Chrome and full range of screen capturing tools will be at your disposal.
Conclusion
Possibilities for personal and professional communication are almost unlimited once you master the advanced features of the Vimeo screen recorder of your choice. Regardless of your choice of software tools, it’s very easy to produce high-end educational materials and how-to-do videos, or simply share your current thoughts with online friends.
However, if you have an ambitious project, built-in screen recording tools may not be sufficiently advanced. Using the Wondershare Filmora X to record and edit Vimeo clips based on the feed from your screen and webcam is a better option, especially for users who understand how to effectively use the finer video-making features of this incredible software. You can even record your mobile screen and create videos nearly instantly, so your creativity is virtually unbound when you have the right tools in your hands.
Shanoon Cox
Shanoon Cox is a writer and a lover of all things video.
Follow @Shanoon Cox
Shanoon Cox
Mar 27, 2024• Proven solutions
Access to communication with customers and team members becomes far better, faster, and more interactive with Vimeo screen recording. Constant emailing, slow response times and frequent misunderstandings are the things of the past. The Vimeo recorder provides face-to-face communication and much-needed support even though you may be located miles away.
One of its greatest features is that you can capture both the camera feed and your screen at the same time , and show everyone exactly what you intended. Team members or customers will appreciate this type of interactive collaboration, and might respond with increased productivity, satisfaction, and loyalty. With Vimeo recorder, you can successfully create educational tutorials, sales presentations, or show a demo version of your product.
This extraordinary platform allows you to upload any type of video files and use advanced tools to organize, manage and publish your content.
Part 1: How to Use Vimeo Record Tool to Record Your Screen on Windows and Mac?
Almost every Windows and Mac device has a built-in screen recorder, and those are typically quite solid and fairly easy to use. Still, at times may be necessary to go beyond the built-in tool frameworks, and infuse your work with exceptional professionalism.
You can achieve that with the Vimeo Record tool. You don’t need to be concerned about compatibility when you work with Vimeo recorder, as it supports Windows, Mac, Android, iPad, iPhone, or iPod Touch. Since virtually all devices can run the Google Chrome browser, pretty much anyone can use the Video Record Chrome extension to record the screen.
The process is not complicated, and even non-tech users can simply run the extension. We introduce you in detail to the screen recording procedure with this great Vimeo recorder.
- Install Vimeo Record Extension
Currently, the Vimeo Record chrome extension works on the Google Chrome browser only. If you don’t already have a Google Chrome browser on your device, install and launch it. After that, download the Vimeo Record Chrome extension , and create a new Vimeo account.
You will access this tool faster, with just one click, if add and pin the extension to your top bar. It is important to allow Vimeo extension to have access to your camera and microphone.
- Start Recording with Vimeo Recorder
Click the Vimeo Record icon in the extension toolbar, and then decide to record the full screen or current tab screen, or record the camera to include footage of yourself in the video or both. If you decide to keep the webcam on, you can drag and drop camera preview to the part on the screen you want to record, and use that camera feed like a mirror to get feedback of your face.

Click the Start recording button to record. After you start the recording session, you can show your creativity and capture the actions you are taking.
The recording will be saved even if something unforeseen happens, for example, if your internet connection snaps.
On the other hand, the process will be interrupted if the extension loses access to the camera, screen, or microphone. It is important to know that recordings are limited to a maximum of two hours per video.
- Stop recording with Vimeo Recorder and share
When you decide to stop recording, find the Stop sharing button at the bottom of your screen. Click on it, and save the video.
If you are satisfied with the video you recorded and want to share it, you can select one of many distribution options from the Vimeo recorder interface, or just copy the link at the bottom of the screen to share. You can also click the download icon to save it to the local.
The video will be uploaded to your Vimeo account and stored in the Recordings folder as well. If you are an Enterprise team member, the video will be uploaded to your Private folder on the Enterprise team account. Click the View Settings on Vimeo and you can add a title and description of the video in Vimeo directly.
You can choose whether to download the video privately, or publish it on social media. The Vimeo extension allows sharing the video only with people you choose.
Part 2: How to Record Vimeo Video Screens on Mobile?
As we said before, the Vimeo Record tool is currently available as a Chrome extension, and there is no app of Vimeo Record for iPhone or Android devices. But if you want to record the Vimeo video screen on mobile, you can do that.
Android devices, including Android 10, offer built-in screen recording . Here is how to capture the content of your Android mobile screen:
In the Quick Settings menu, launch Screen Recording. Of course, depending on the purpose of your video, you can allow access to mic only, camera only, or both. At the beginning of the process, you will see a short countdown - 3, 2, 1, and the recording starts. Piece of cake!
After you are done performing all the actions on your phone that you want to share on Vimeo, just stop recording and your video will be saved automatically in the cloud. You can download videos to your phone or share them instantly through one or more social media platforms. It’s not hard to stay in touch with all the recordings and get notifications whenever someone views the video and comments. Using this approach for business will put you in a better position in the market and stimulate engagement with the customers.
If you are using the iOS devices, you can record the Vimeo video screen with the in-built screen recorder feature if your iPhone is running iOS 11 and later versions. We have written an article about how to record iPhone/iPad’s screen in detail, you can find all the information needed.
Part 3: How to Record Vimeo Video Screen with Wondershare Filmora X?
Wondershare Filmora is a great solution for screen recording and video editing. This software suite is packed with professional-level options and stunning visual effects, allowing you to do far more than simply capture the screen. Among other things, you can precisely define which section of the screen to record, eliminate camera shake effect or noise, add music to the background, and improve the quality of your videos in many creative ways.
In other words, using Filmora to record your screen and webcam gives you additional options to express yourself and fulfill your business objectives while saving time for you and your team. Of course, Filmora X can share the content directly to Vimeo or save it for further editing.
Starting a screen recording in Filmora X is a straightforward process as you just have to navigate to the Record drop-down menu, and then select the Record PC Screen option. A new window will pop up on your screen where you can adjust the settings for your next screen capturing session.
The software lets you specify the area of the screen you want to capture or record the entire screen, as well as choose the preferred video resolution. In addition, you have to make sure that external microphone is selected in the audio menu if you want to narrate your video.
Furthermore, ticking the Record the Camera Stream checkbox at the bottom of the window will enable you to capture the screen and webcam feed simultaneously. When ready, you should click on the Red Record button to initiate the screen recording session.
Filmora X lets you pause the recording whenever you want, while you can also use the Record Timer box to limit the duration of the session. After you’ve recorded the footage, you can use the video editor’s tools to polish the footage before exporting it or uploading it to your Vimeo account.
Quick Fix: Why I Can’t Use Vimeo Recorder on My Mac Computer?
After installing the Vimeo screen recorder, Mac users sometimes need to perform a few preparatory steps to allow the extension to launch. Open System Preferences, and click the Security & Privacy icon. Scroll to Screen Recording, and allow Google Chrome access to the content of the screen.
Of course, at this point, you’ll also have to grant permission to access your camera and microphone. Once you activate all the necessary options, restart Chrome and full range of screen capturing tools will be at your disposal.
Conclusion
Possibilities for personal and professional communication are almost unlimited once you master the advanced features of the Vimeo screen recorder of your choice. Regardless of your choice of software tools, it’s very easy to produce high-end educational materials and how-to-do videos, or simply share your current thoughts with online friends.
However, if you have an ambitious project, built-in screen recording tools may not be sufficiently advanced. Using the Wondershare Filmora X to record and edit Vimeo clips based on the feed from your screen and webcam is a better option, especially for users who understand how to effectively use the finer video-making features of this incredible software. You can even record your mobile screen and create videos nearly instantly, so your creativity is virtually unbound when you have the right tools in your hands.
Shanoon Cox
Shanoon Cox is a writer and a lover of all things video.
Follow @Shanoon Cox
Shanoon Cox
Mar 27, 2024• Proven solutions
Access to communication with customers and team members becomes far better, faster, and more interactive with Vimeo screen recording. Constant emailing, slow response times and frequent misunderstandings are the things of the past. The Vimeo recorder provides face-to-face communication and much-needed support even though you may be located miles away.
One of its greatest features is that you can capture both the camera feed and your screen at the same time , and show everyone exactly what you intended. Team members or customers will appreciate this type of interactive collaboration, and might respond with increased productivity, satisfaction, and loyalty. With Vimeo recorder, you can successfully create educational tutorials, sales presentations, or show a demo version of your product.
This extraordinary platform allows you to upload any type of video files and use advanced tools to organize, manage and publish your content.
Part 1: How to Use Vimeo Record Tool to Record Your Screen on Windows and Mac?
Almost every Windows and Mac device has a built-in screen recorder, and those are typically quite solid and fairly easy to use. Still, at times may be necessary to go beyond the built-in tool frameworks, and infuse your work with exceptional professionalism.
You can achieve that with the Vimeo Record tool. You don’t need to be concerned about compatibility when you work with Vimeo recorder, as it supports Windows, Mac, Android, iPad, iPhone, or iPod Touch. Since virtually all devices can run the Google Chrome browser, pretty much anyone can use the Video Record Chrome extension to record the screen.
The process is not complicated, and even non-tech users can simply run the extension. We introduce you in detail to the screen recording procedure with this great Vimeo recorder.
- Install Vimeo Record Extension
Currently, the Vimeo Record chrome extension works on the Google Chrome browser only. If you don’t already have a Google Chrome browser on your device, install and launch it. After that, download the Vimeo Record Chrome extension , and create a new Vimeo account.
You will access this tool faster, with just one click, if add and pin the extension to your top bar. It is important to allow Vimeo extension to have access to your camera and microphone.
- Start Recording with Vimeo Recorder
Click the Vimeo Record icon in the extension toolbar, and then decide to record the full screen or current tab screen, or record the camera to include footage of yourself in the video or both. If you decide to keep the webcam on, you can drag and drop camera preview to the part on the screen you want to record, and use that camera feed like a mirror to get feedback of your face.
Click the Start recording button to record. After you start the recording session, you can show your creativity and capture the actions you are taking.
The recording will be saved even if something unforeseen happens, for example, if your internet connection snaps.
On the other hand, the process will be interrupted if the extension loses access to the camera, screen, or microphone. It is important to know that recordings are limited to a maximum of two hours per video.
- Stop recording with Vimeo Recorder and share
When you decide to stop recording, find the Stop sharing button at the bottom of your screen. Click on it, and save the video.
If you are satisfied with the video you recorded and want to share it, you can select one of many distribution options from the Vimeo recorder interface, or just copy the link at the bottom of the screen to share. You can also click the download icon to save it to the local.
The video will be uploaded to your Vimeo account and stored in the Recordings folder as well. If you are an Enterprise team member, the video will be uploaded to your Private folder on the Enterprise team account. Click the View Settings on Vimeo and you can add a title and description of the video in Vimeo directly.
You can choose whether to download the video privately, or publish it on social media. The Vimeo extension allows sharing the video only with people you choose.
Part 2: How to Record Vimeo Video Screens on Mobile?
As we said before, the Vimeo Record tool is currently available as a Chrome extension, and there is no app of Vimeo Record for iPhone or Android devices. But if you want to record the Vimeo video screen on mobile, you can do that.
Android devices, including Android 10, offer built-in screen recording . Here is how to capture the content of your Android mobile screen:
In the Quick Settings menu, launch Screen Recording. Of course, depending on the purpose of your video, you can allow access to mic only, camera only, or both. At the beginning of the process, you will see a short countdown - 3, 2, 1, and the recording starts. Piece of cake!
After you are done performing all the actions on your phone that you want to share on Vimeo, just stop recording and your video will be saved automatically in the cloud. You can download videos to your phone or share them instantly through one or more social media platforms. It’s not hard to stay in touch with all the recordings and get notifications whenever someone views the video and comments. Using this approach for business will put you in a better position in the market and stimulate engagement with the customers.
If you are using the iOS devices, you can record the Vimeo video screen with the in-built screen recorder feature if your iPhone is running iOS 11 and later versions. We have written an article about how to record iPhone/iPad’s screen in detail, you can find all the information needed.
Part 3: How to Record Vimeo Video Screen with Wondershare Filmora X?
Wondershare Filmora is a great solution for screen recording and video editing. This software suite is packed with professional-level options and stunning visual effects, allowing you to do far more than simply capture the screen. Among other things, you can precisely define which section of the screen to record, eliminate camera shake effect or noise, add music to the background, and improve the quality of your videos in many creative ways.
In other words, using Filmora to record your screen and webcam gives you additional options to express yourself and fulfill your business objectives while saving time for you and your team. Of course, Filmora X can share the content directly to Vimeo or save it for further editing.
Starting a screen recording in Filmora X is a straightforward process as you just have to navigate to the Record drop-down menu, and then select the Record PC Screen option. A new window will pop up on your screen where you can adjust the settings for your next screen capturing session.

The software lets you specify the area of the screen you want to capture or record the entire screen, as well as choose the preferred video resolution. In addition, you have to make sure that external microphone is selected in the audio menu if you want to narrate your video.
Furthermore, ticking the Record the Camera Stream checkbox at the bottom of the window will enable you to capture the screen and webcam feed simultaneously. When ready, you should click on the Red Record button to initiate the screen recording session.
Filmora X lets you pause the recording whenever you want, while you can also use the Record Timer box to limit the duration of the session. After you’ve recorded the footage, you can use the video editor’s tools to polish the footage before exporting it or uploading it to your Vimeo account.
Quick Fix: Why I Can’t Use Vimeo Recorder on My Mac Computer?
After installing the Vimeo screen recorder, Mac users sometimes need to perform a few preparatory steps to allow the extension to launch. Open System Preferences, and click the Security & Privacy icon. Scroll to Screen Recording, and allow Google Chrome access to the content of the screen.
Of course, at this point, you’ll also have to grant permission to access your camera and microphone. Once you activate all the necessary options, restart Chrome and full range of screen capturing tools will be at your disposal.
Conclusion
Possibilities for personal and professional communication are almost unlimited once you master the advanced features of the Vimeo screen recorder of your choice. Regardless of your choice of software tools, it’s very easy to produce high-end educational materials and how-to-do videos, or simply share your current thoughts with online friends.
However, if you have an ambitious project, built-in screen recording tools may not be sufficiently advanced. Using the Wondershare Filmora X to record and edit Vimeo clips based on the feed from your screen and webcam is a better option, especially for users who understand how to effectively use the finer video-making features of this incredible software. You can even record your mobile screen and create videos nearly instantly, so your creativity is virtually unbound when you have the right tools in your hands.
Shanoon Cox
Shanoon Cox is a writer and a lover of all things video.
Follow @Shanoon Cox
- Title: [Updated] In 2024, Mastering Vimeo Recorder Capturing Screens & Cameras on Streams
- Author: Michael
- Created at : 2024-07-15 14:14:40
- Updated at : 2024-07-16 14:14:40
- Link: https://vimeo-videos.techidaily.com/updated-in-2024-mastering-vimeo-recorder-capturing-screens-and-cameras-on-streams/
- License: This work is licensed under CC BY-NC-SA 4.0.