
"Comprehensive Walkthrough Posting iMovie Videos to Vimeo"
Comprehensive Walkthrough: Posting iMovie Videos to Vimeo
How to Upload iMovie Video to Vimeo

Ollie Mattison
Mar 27, 2024• Proven solutions
Many users would like to share their videos from iMovie to their social networks, such as YouTube, Facebook, and Vimeo. iMovie’s “Share” option makes it easy to upload your new video straight to your social networks account from iMovie. In this article, we’ll teach you how to upload iMovie videos to Vimeo easily and smoothly.
Part 1: How to Upload iMovie Videos to Vimeo
In order to upload iMovie videos to Vimeo, you have to set up an account with Vimeo before uploading videos. Watch the video below to upload iMovie video to Vimeo.
Here’re the detailed steps:
Step 1: Click the Share button which can be located at the top of your screen.

Step 2: Select Vimeo.
Then all you need to do is to enter the email address you used to log into Vimeo, your password as well as a title, description, and tags for the video. You can also select which size you’d like your video to be. Then read the Vimeo terms of service and click Publish.
Step 3: Wait for the pop-up message to appear indicating your upload is complete.
Part 2: How to Compress the Video
When trying to upload iMovie videos to Vimeo, many people may get a pop up telling them the file is too big. Don’t dismay as compressing the video will allow you to upload without additional problems.
Step 1: Find the export settings in your program, generally under “File – Export”, “File – Share”, or “Save As”.
Step 2: Select “File” and save the video to Mac.
Step 3: Compress the video.
An alternative to the aforementioned compression method is to use Compressor. Before you can do anything, you need to set up an account first or use an existing Facebook or Google account to do so.
One of the most popular tools that can significantly shrink the file size without losing quality is ClipChamp .
Follow this instruction to compress your videos without sacrificing the quality.
Step 1: Upload your video and set it to compress.
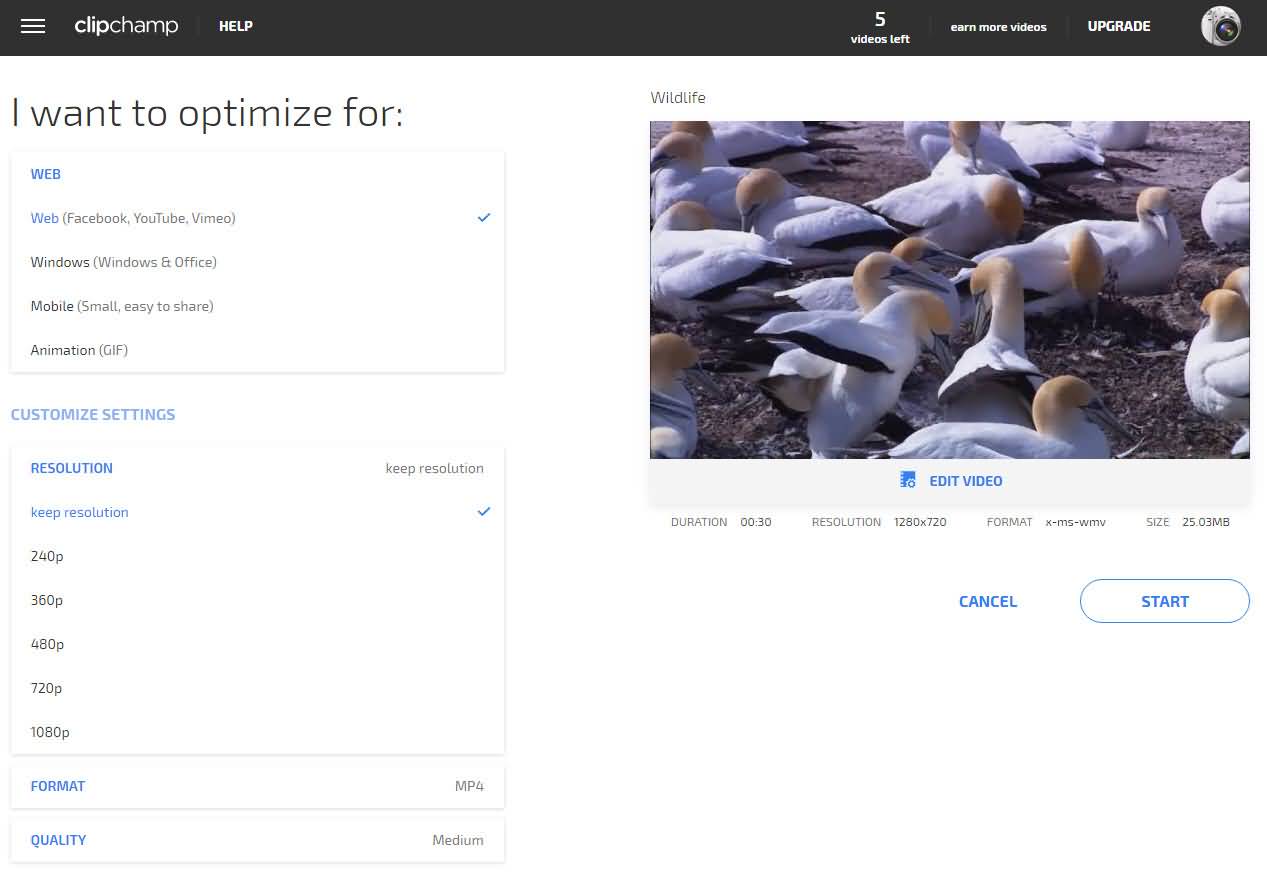
Step 2: Press Start to begin compressing.
Step 3: Then share the video directly to Vimeo.

As you can see, using the Clipchamp compressor to compress before you upload iMovie videos to Vimeo is a simpler, faster way to do. It’s great for people who are new to video making, editing, and uploading. For those with more skill, reducing the steps is an excellent way to save time and get videos up faster.
Ollie Mattison
Ollie Mattison is a writer and a lover of all things video.
Follow @Ollie Mattison
Ollie Mattison
Mar 27, 2024• Proven solutions
Many users would like to share their videos from iMovie to their social networks, such as YouTube, Facebook, and Vimeo. iMovie’s “Share” option makes it easy to upload your new video straight to your social networks account from iMovie. In this article, we’ll teach you how to upload iMovie videos to Vimeo easily and smoothly.
Part 1: How to Upload iMovie Videos to Vimeo
In order to upload iMovie videos to Vimeo, you have to set up an account with Vimeo before uploading videos. Watch the video below to upload iMovie video to Vimeo.
Here’re the detailed steps:
Step 1: Click the Share button which can be located at the top of your screen.
Step 2: Select Vimeo.
Then all you need to do is to enter the email address you used to log into Vimeo, your password as well as a title, description, and tags for the video. You can also select which size you’d like your video to be. Then read the Vimeo terms of service and click Publish.
Step 3: Wait for the pop-up message to appear indicating your upload is complete.
Part 2: How to Compress the Video
When trying to upload iMovie videos to Vimeo, many people may get a pop up telling them the file is too big. Don’t dismay as compressing the video will allow you to upload without additional problems.
Step 1: Find the export settings in your program, generally under “File – Export”, “File – Share”, or “Save As”.
Step 2: Select “File” and save the video to Mac.
Step 3: Compress the video.
An alternative to the aforementioned compression method is to use Compressor. Before you can do anything, you need to set up an account first or use an existing Facebook or Google account to do so.
One of the most popular tools that can significantly shrink the file size without losing quality is ClipChamp .
Follow this instruction to compress your videos without sacrificing the quality.
Step 1: Upload your video and set it to compress.
Step 2: Press Start to begin compressing.
Step 3: Then share the video directly to Vimeo.
As you can see, using the Clipchamp compressor to compress before you upload iMovie videos to Vimeo is a simpler, faster way to do. It’s great for people who are new to video making, editing, and uploading. For those with more skill, reducing the steps is an excellent way to save time and get videos up faster.
Ollie Mattison
Ollie Mattison is a writer and a lover of all things video.
Follow @Ollie Mattison
Also read:
- [New] 2024 Approved A Comprehensive Approach to Adding Text Overlays (Vimeo)
- [New] Downloading From Vimeo Made Simple Software-Free or Not, In 2024
- [New] In 2024, Step-by-Step Guide Embedding Vimeo Videos Into Presentations
- [New] Unleashing Your Brand Potential with Advanced Insights on Instagram Data for 2024
- [Updated] Effective Habits to Monitor and Record GoToMeetings
- [Updated] In 2024, Free Video Trimming Tutorial with Vimeo Features
- [Updated] In 2024, Rise with the Pros Acquire 1K IG Admirers Daily
- [Updated] Pioneering Filmmakers Unite Leveraging Screen & Webcam Capture with Vimeo
- [Updated] Sonic Sleuths' Den Acquire & Scrutinize Audio Files for 2024
- Authentication Error Occurred on Sony Xperia 5 V? Here Are 10 Proven Fixes | Dr.fone
- How to Track a Lost Nokia C110 for Free? | Dr.fone
- In 2024, How and Where to Find a Shiny Stone Pokémon For Nokia C12 Plus? | Dr.fone
- In 2024, Securing Spotlight Uploading iMovie to Vimeo Successfully
- In 2024, The Ultimate Manual to Earn Through Vimeo's Revenue Channels
- Mending Broken Connection with Friendster (Facebook)
- Navigating the Process Windows Movie Maker Content on Vimeo for 2024
- Personalized Content Sharing on Vimeo Basic, Plus & Pro Explained
- Unveiling the Mysteries High-Quality Minecraft Capture on MacOS for 2024
- What Pokémon Evolve with A Dawn Stone For Nokia C12? | Dr.fone
- Title: Comprehensive Walkthrough Posting iMovie Videos to Vimeo
- Author: Michael
- Created at : 2025-01-17 00:26:54
- Updated at : 2025-01-17 18:02:38
- Link: https://vimeo-videos.techidaily.com/comprehensive-walkthrough-posting-imovie-videos-to-vimeo/
- License: This work is licensed under CC BY-NC-SA 4.0.